In dieser Anleitung zeige ich, wie das Open-Source Monitoring Tool Zabbix (Server) unter Debian 8 Jessie installiert wird. Auf Grund dessen, dass die offiziellen Pakete von Zabbix in Debian Jessie nur in der Version 2.2.7 vorliegen, die aktuelle Version von Zabbix aber die 3.0.4 ist, werde ich das offizielle Repository von Zabbix nutzen und als Paket installieren.
Zabbix – Voraussetzung
| Pre-requisite | Minimum value | Description |
|---|---|---|
| PHP version | 5.4.0 | |
| PHP memory_limit option | 128MB | In php.ini: memory_limit = 128M |
| PHP post_max_size option | 16MB | In php.ini: post_max_size = 16M |
| PHP upload_max_filesize option | 2MB | In php.ini: upload_max_filesize = 2M |
| PHP max_execution_time option | 300 seconds (values 0 and -1 are allowed) | In php.ini: max_execution_time = 300 |
| PHP max_input_time option | 300 seconds (values 0 and -1 are allowed) | In php.ini: max_input_time = 300 |
| PHP session.auto_start option | must be disabled | In php.ini: session.auto_start = 0 |
| Database support | One of: IBM DB2, MySQL, Oracle, PostgreSQL, SQLite | One of the following modules must be installed: ibm_db2, mysql, oci8, pgsql, sqlite3 |
| bcmath | php-bcmath | |
| mbstring | php-mbstring | |
| PHP mbstring.func_overload option | must be disabled | In php.ini: mbstring.func_overload = 0 |
| PHP always_populate_raw_post_data option | must be disabled | Required only for PHP versions 5.6.0 or newer. In php.ini: always_populate_raw_post_data = -1 |
| sockets | php-net-socket. Required for user script support. | |
| gd | 2.0 or higher | php-gd. PHP GD extension must support PNG images (–with-png-dir), JPEG (–with-jpeg-dir) images and FreeType 2 (–with-freetype-dir). |
| libxml | 2.6.15 | php-xml or php5-dom |
| xmlwriter | php-xmlwriter | |
| xmlreader | php-xmlreader | |
| ctype | php-ctype | |
| session | php-session | |
| gettext | php-gettext Since Zabbix 2.2.1, the PHP gettext extension is not a mandatory requirement for installing Zabbix. If gettext is not installed, the frontend will work as usual, however, the translations will not be available. |
Zabbix – Download Zabbix Server V3.0.4
- # wget http://repo.zabbix.com/zabbix/3.0/debian/pool/main/z/zabbix-release/zabbix-release_3.0-1+jessie_all.deb
- # dpkg -i zabbix-release_3.0-1+jessie_all.deb
- # aptitude update
- # aptitude install zabbix-server-mysql zabbix-frontend-php
- Zabbix wird unter „/usr/share/zabbix/“ installiert
Zabbix Server – Installation Datenbank
Namen und Werte:
- Server = localhost
- Datenbank = zabbix
- DB-User = zabbix
- DB-Passwort = <passwort>
los gehts:
- # mysql -u root -p <passwort>
- # mysql> create database zabbix character set utf8 collate utf8_bin;
- # mysql> grant all privileges on zabbix.* to zabbix@localhost identified by ‚<passwort>‘;
- # mysql> quit;
- # cd /usr/share/doc/zabbix-server-mysql/
- # zcat create.sql.gz | mysql -u zabbix -p <passwort> zabbix
Zabbix – Serverkonfiguration
- # mcedit /etc/zabbix/zabbix_server.conf
- DBHost=localhost
- DBName=zabbix
- DBUser=zabbix
- DBPassword=<passwort>
Zabbix – Server start
- service zabbix-server start
Zabbix – Apache PHP Konfiguration
- # mcedit /etc/apache2/conf.d/zabbix
- (ist ein Symlink auf /etc/zabbix/apache.conf)
- bzw. # mcedit /etc/php5/apache2/php.ini
Die Werte sollten dann wie folgt aussehen – die Zeitzone musst du auf deine Anforderung anpassen und aktivieren:
php_value max_execution_time 300
php_value memory_limit 128M
php_value post_max_size 16M
php_value upload_max_filesize 2M
php_value max_input_time 300
php_value always_populate_raw_post_data -1
# php_value date.timezone Europe/Riga
php_value date.timezone Europe/Berlin
- # cp /etc/apache2/conf.d/zabbix /etc/apache2/sites-available/zabbix.conf
- # mcedit /etc/php5/apache2/php.ini
- auskommentieren / aktivieren von always_populate_raw_post_data -1
- # systemctl restart apache2
Zabbix – Installation Webkonsole
- Aufruf der Seite http://localhost/zabbix im Browser
- Zabbix für ein pre-requisites durch, wenn obige Werte hinterlegt sind, sollten alle Checks mit OK quittiert werden
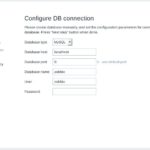
- nun folgt die Konfiguration der Verbindung zur Datenbank, entsprechend die eigenen Werte eintragen
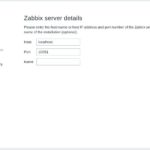
- Next Step -> Zabbix Host, Port und einen Namen der Installation eintragen
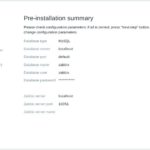
- Abschließend wird die Zusammenfassung der hinterlegten Daten angezeigt
- die Installation läuft und wird wie hier mit der Success Meldung quitiert – Finish
- danach wird zur Anmeldung von Zabbix weitergeleitet,
- der Benutzer ist „Admin“ und das Passwort „zabbix“ !Case sensitiv!
Damit ist die Installation von Zabbix 3.0.4 abgeschlossen und es können weitere Schritte zur Anpassung und Einstellung in Zabbix sowie der Erfassung der Daten vorgenommen werden.
Zabbix 3.0 Dokumentation https://www.zabbix.com/documentation/3.0/start
Hinweis: bei mir wurde der erfolgreiche Login auf zabbix.php weitergeleitet und mit 404 Fehler quitiert. Eigenartigerweise fehlte die Datei im Webverzeichnis. Ich habe sie einfach aus der Installationsquelle hinkopiert und die Rechte angepasst.

Interessiert in verschiedenste IT Themen, schreibe ich in diesem Blog über Software, Hardware, Smart Home, Games und vieles mehr. Ich berichte z.B. über die Installation und Konfiguration von Software als auch von Problemen mit dieser. News sind ebenso spannend, sodass ich auch über Updates, Releases und Neuigkeiten aus der IT berichte. Letztendlich nutze ich Taste-of-IT als eigene Dokumentation und Anlaufstelle bei wiederkehrenden Themen. Ich hoffe ich kann dich ebenso informieren und bei Problemen eine schnelle Lösung anbieten. Wer meinen Aufwand unterstützen möchte, kann gerne eine Tasse oder Pod Kaffe per PayPal spenden – vielen Dank.


Pingback:Zabbix 3 neuen Host hinzufügen - TASTE-OF-IT